TL;DR
- Hardware: TP-Link Archer C6 v3 running OpenWrt 24.10.2, a Netgear S350-series smart switch, and Home Assistant watching everything via SNMP.
- Goals: Static LAN + guest subnets, isolated firewall zones, WireGuard server for remote work, and a dashboard that makes the switch report like it’s on TV.
- Outcome: One tidy network, one VPN door, no rude guests crawling into the main LAN, and dashboards full of delicious telemetry.
Supplies & Preconditions
- An Archer C6 v3 with OpenWrt already installed.
- A managed switch (I use the Netgear S350 / GS308T lineage) with SNMP enabled.
- Home Assistant able to talk SNMP and ingest the networking dashboard.
- A sense of humor to tolerate occasional PSK mismatch log spam.
Step 1: Mirror the Interface Skeleton
Think of this as laying out the stage. The Archer C6 publishes:
br-lan( static LAN:192.168.0.1/24, bridged tolan1-lan4,phy0-ap0,phy1-ap0)br-guest( guest VLAN:192.168.30.1/24, bridged tophy0-ap1)wan/wan6( the uplink facing 192.168.86.46/24 and its IPv6 twin )wg0( WireGuard:10.10.10.1/24,allowed_ips=10.10.10.2/32)
Take inspiration from the interfaces tab in LuCI and reproduce it with the following commands (adjust interface names if your device differs):
uci set network.lan.proto='static'
uci set network.lan.ipaddr='192.168.0.1'
uci set network.lan.netmask='255.255.255.0'
uci set network.lan.dns='192.168.0.240 1.1.1.1'
uci set network.lan.ip6assign='60'

uci set network.guest.proto='static'
uci set network.guest.ipaddr='192.168.30.1'
uci set network.guest.netmask='255.255.255.0'
uci set network.guest.device='br-guest'
uci set network.guest.defaultroute='0'

uci set network.wan.proto='dhcp'
uci set network.wan.peerdns='0'

uci batch <<'EOF'
add network device
  option name 'br-guest'
  option type 'bridge'
  option ports 'phy0-ap1'
EOF

uci commit network
/etc/init.d/network reload
Now confirm with ip addr show, brctl show, and uci show network. The interfaces page in LuCI should resemble the screenshot below, so the LAN and guest VLANs look like they “belong.”
Step 2: Harden the Firewall with Distinction
The firewall keeps my LAN, guest, and WAN in respectable lanes. Use these commands to match the structure:
uci set firewall.defaults.input='REJECT'
uci set firewall.defaults.forward='REJECT'
uci set firewall.defaults.output='ACCEPT'

uci set firewall.@zone[0].name='lan'
uci add_list firewall.@zone[0].network='lan'
uci set firewall.@zone[0].input='ACCEPT'
uci set firewall.@zone[0].forward='ACCEPT'

uci set firewall.@zone[1].name='wan'
uci add_list firewall.@zone[1].network='wan'
uci add_list firewall.@zone[1].network='wan6'
uci set firewall.@zone[1].masq='1'
uci set firewall.@zone[1].input='REJECT'
uci set firewall.@zone[1].forward='REJECT'

uci set firewall.@zone[2].name='guest'
uci add_list firewall.@zone[2].network='guest'
uci set firewall.@zone[2].masq='1'
uci set firewall.@zone[2].defaultroute='0'
uci set firewall.@zone[2].input='ACCEPT'
uci set firewall.@zone[2].forward='ACCEPT'

uci add firewall.forwarding
uci set firewall.@forwarding[-1].src='lan'
uci set firewall.@forwarding[-1].dest='wan'

uci add firewall.forwarding
uci set firewall.@forwarding[-1].src='guest'
uci set firewall.@forwarding[-1].dest='wan'

uci add firewall.redirect
uci set firewall.@redirect[-1].name='Force-DNS'
uci set firewall.@redirect[-1].src='lan'
uci set firewall.@redirect[-1].proto='tcp udp'
uci set firewall.@redirect[-1].src_dport='53'
uci set firewall.@redirect[-1].dest='lan'
uci set firewall.@redirect[-1].dest_port='53'
uci set firewall.@redirect[-1].dest_ip='192.168.0.1'

uci add firewall.rule
uci set firewall.@rule[-1].name='Allow-Wireguard'
uci set firewall.@rule[-1].src='wan'
uci set firewall.@rule[-1].dest_port='51820'
uci set firewall.@rule[-1].proto='udp'
uci set firewall.@rule[-1].target='ACCEPT'

uci commit firewall
/etc/init.d/firewall reload
Return to the firewall zone settings page to ensure Masquerading and Allow-Wireguard are enabled, just like in the screenshot.
Step 3: Install the WireGuard Escape Hatch
The in-house VPN requires minimal configuration:
uci set network.wg0=interface
uci set network.wg0.proto='wireguard'
uci set network.wg0.listen_port='51820'
uci set network.wg0.addresses='10.10.10.1/24'
uci set network.wg0.private_key='$(wg genkey)'

uci add network.wg0=wireguard_wg0
uci set network.@wireguard_wg0[-1].allowed_ips='10.10.10.2/32'
uci set network.@wireguard_wg0[-1].persistent_keepalive='25'

uci commit network
/etc/init.d/network reload
Swap the private_key placeholder with a real key generated by wg genkey. After reloading, wg show should list wg0 with one peer; cross-reference it in LuCI’s WireGuard interface for confirmation.
Step 4: Observability & SNMP Theater
Collectd is already running the basics. Replicate my setup with:
uci set statistics.collectd_cpu.enable='1'
uci set statistics.collectd_cpu.reportbycpu='1'
uci set statistics.collectd_cpu.reportbystate='1'

uci set statistics.collectd_interface.enable='1'
uci set statistics.collectd_interface.Interfaces='br-lan'

uci set statistics.collectd_memory.enable='1'
uci set statistics.collectd_memory.ValuesAbsolute='1'

uci commit statistics
/etc/init.d/statistics restart
Those modules feed LuCI’s dashboards and keep the router from being a “black box”.
Now bring the Netgear switch into the narrative. Enable SNMP on its admin portal, point Home Assistant to it, and treat the switch as your telemetry poet. The switch screenshot below proves it still knows who it is:
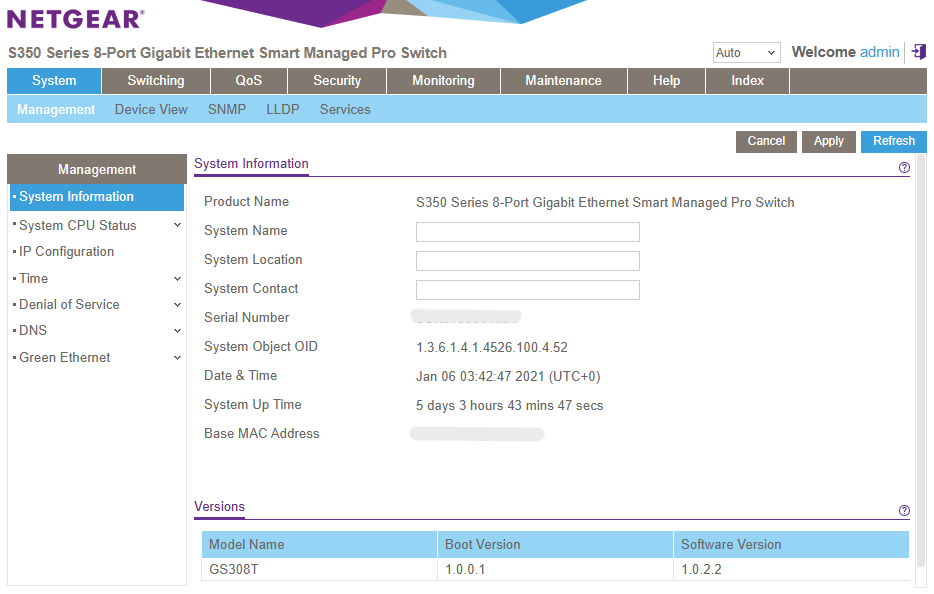 Caption: The switch, proud of its firmware version and ready to dish out SNMP counters.
In Home Assistant, add the SNMP integration and the networking dashboard tab shown below. The dashboard listens to the switch’s ports and the router’s status markers (Wi-Fi clients, guest count, etc.).
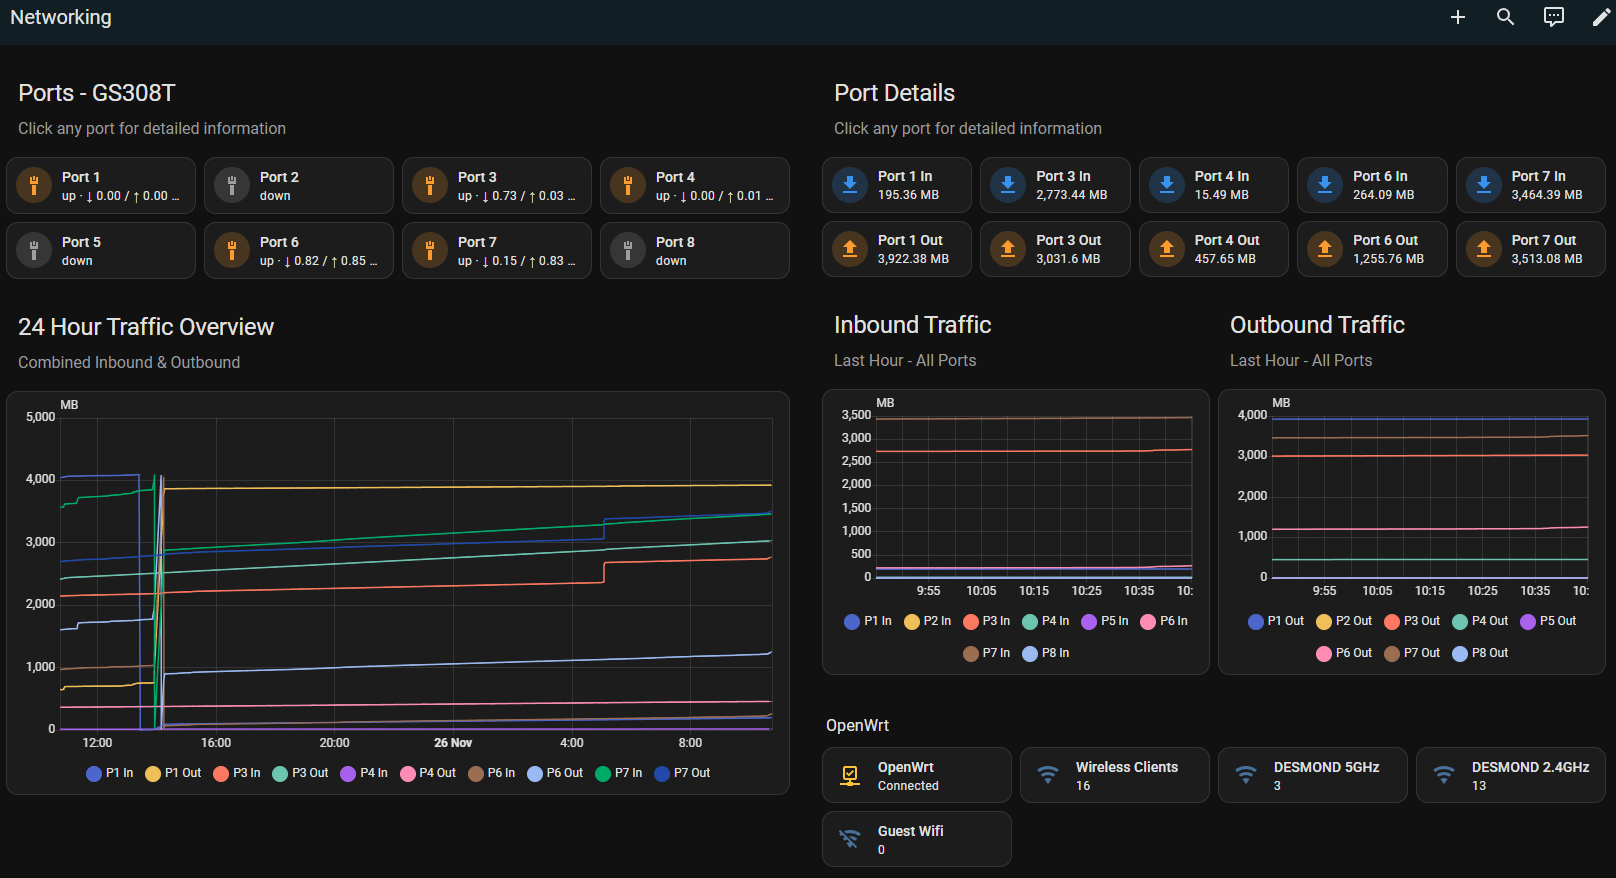 Caption: This dashboard is basically the gossip column you read every morning before coffee.
Step 5: Keep an Eye on the Headlines
mwan3track will ping 1.1.1.1 to ensure the WAN path behaves. If you notice Check (ping) failed for target "1.1.1.1" in logread | tail -n 20, don’t panic—our scripts already bumped the score to 10 and eventually acclimate. Still, add a cron job or external monitor if this log becomes a daily soap opera.
Use these handy commands for maintenance:
| Action | Command |
|---|---|
| Verify interfaces | ip addr show + brctl show |
| View firewall rules | uci show firewall or cat /etc/config/firewall |
| Check WireGuard status | wg show |
| Tail WAN health | `logread |
| Snapshot running services | `ps |
Encore: Putting It All Together
When you’ve completed these steps, your Archer C6 will look like the magazine spread above—guest VLAN on one page, LAN acting prim and proper, and a WireGuard sidebar always ready for a cameo. The switch sends SNMP gossip to Home Assistant, so you never miss a port drama. If you feel like it, package the config snippets into a repo, automate with uci batch, and share the zine with fellow homelab journalists.